Wednesday, January 30, 2013

African Black Soap - THE NEW 'POO

Yes... Soap as shampoo! I know some of y'all think I am just crazy by now but I am serious!

If you've been following my blog you will know that I've had some scalp issues. In the journey if trying to heal them, I decided to try the Shea moisture line African Black Soap. I've heard a lot people use it so I thought it wouldn't hurt.

Well I can say. I loved it! My scalp was really clean and felt silky. I absolute loved it. And it seems like my hair stayed hydrated because I didn't even do an oil treatment before the wash or a deep conditioning. (Long week + laziness)

So anyhow, I finally got around to washing Pooh's hair last night also. I used the soap with her as well and had the same results! Again, very pleased. So it looks like I'll be changing this part of my regimen. No more apple cider vinegar, conditioner, and water.

By the way, Pooh's hair has been up for almost a month now and KK's 3 weeks! They (the twists) still look great!


Tuesday, January 29, 2013

Healing My Scalp Week 2

Nights 1 and 2 - January 27-28
Ok...I have to say that I have STILL not washed my hair. I've been loaded with work but hopefully I can get to it tonight.
I've been doing the same applications of ACV spray, Shea butter mix, and oil. No Monistat mix. No coconut oil either. Yes, laziness mixed with tiredness. But definitely for night 3 I will wash. I feel like I have product build up and the middle of my scalp is irritated a bit and I know I need a good cleansing.
So tonight - night 3- has to be the night!

The pics may not tell the actual damage because I didn't take a picture of my scalp when it was scaly and ugly looking.  Nevertheless here it is.

Night 3 - January 29
OMG so this Shea Moisture African Black Soap completely made love to my scalp last night! It was extremely soft and overall simply wonderful. My scalp was less irritated.
I also did an hour DC with garlic, olive oil, and Tressemme naturals. Do I notice a difference? Less tenderness. About 95% less. After "shampooing" with the soap, I used my conditioner and left it in while I showered. Afterwards I applied my coconut oil to scalp, and a little Tressemme conditioner. That was it. Itching? Like 3 times I've scratched my scalp. And it wasn't even in the areas that were usually irritated.

I will more than likely juicing a garlic clove and mixing it with oil and applying it to my scalp to see if that will completely clear it up. I'll do a little more research on garlic juice first. On that note...that's it for night 3! I included a picture of my scalp almost 24 hours after the wash. Unfortunately...they really do no justice.

Night 4- January 30
I actually didn't put ANYTHING on my scalp or hair this night. I took a nap, woke up to the work and slept on and off. So of course the last thing I thought about was my hair. The morning, Jan 31, I sprayed my scalp and hair with the leave in conditioner mix and then sealed with coconut oil. I didn't have time to double seal with the Shea butter mix. To protect the area a little better I did place a bun over it and left the back hanging.
The condition of my usually irritated scalp is not to irritated nor is it tender and scarred. I don't even feel the scab.

Now as a science person, the thing that I don't like is not knowing what has actually caused my scalp to heal better...the African black soap or the garlic or the tea tree oil. One thing I do know is that one or all of them work and probably are more effective when combined.

Night 5 Jan 31- Night 7 February 2
No news is good news where I'm from. I've deviated a little from what I started out with. Reason being because my scalp isn't tender and bruised. I can say its healed but not 100%. There are a few places (bumps) but its mainly underneath the twist. What I've been doing the last few days is simply keeping it moisturizer.
My spray bottle has water and conditioner and then I apply the coconut oil on my scalp. The coconut oil has tea tree oil in it. Yesterday, I used the curling soufflé for an added shine. I'm plan to wash again this Thursday and DC with garlic juice mixed in the conditioner. I'm also drinking lemon water because I want to cleanse from the inside as well. This journey may just about be over with! And that's it for week 2!! W


Friday, January 25, 2013

Maintaining Yarn Twists

Well both the girl's hair have been in yarn twist and will be for a few more weeks. Even though this helps on styling I am still "doing" something to their hair nightly even if its just putting their bonnet or scarf on.

Moisture---- Even though I am not styling, I am still inspecting their scalp and new growth for moisture. I re-moisturize every two to three days. I have a bottle of conditioner, oil, and water mix. I spray this on their hair and scalp. Then I apply the Shea butter mix to the hair, not scalp. To the scalp, I apply coconut oil.

Cleansing---- The regimen for this is quite simple. I will wash every 2-3 weeks depending on my schedule. However through the week I spray with apple coder vinegar and water mix. With KK being so young, I also have to inspect for food! Anyway, when I wash I will use a new concoction that I need to add to the regimen: a mix of apple cider vinegar, conditioner, and water. The key thing is making sure to squeeze the product in really good. Then as I'm rinsing to squeeze the product out. I will lock in moisture from the wash the same way- applying oil and Shea butter.

One thing I also inspect - TENSION BUMPS! I've found about two in KK's twist. Usually from the ponytails because she, unlike Pooh, doesn't like to wear her hair down. So that's one thing I look for and remain mindful of.

So, that's pretty much how I maintain these twists. The only deviation from our regular regimen is that I don't wash as often. The yarn holds the moisture really well so it's not really necessary and inspecting the twists and scalp help me determine when it's time to wash.

And that's all folks!!

#KinkyCoilyCool

Monday, January 21, 2013

Can We PLEASE SAVE the EDGES????????

Although the title may seem a little attiduish (is that a word? lol) I really mean no harm. However, I am really serious about this because I myself have been ignorant to the importance of changing my way of "doing hair" for optimal results of my daughter's hair.

EVERYDAY when I'm out I see at LEAST one child (1-4 years old) with edges completely gone. It really, really breaks my heart because that's how Pooh's edges were and KK's edges were on their way to the same. What happened and what did I do to save the edges? ABSOLUTELY nothing except accept that what I was doing was hurting my child's hair AND stopped doing it.

FIRST STEP: NO MORE HEAT!!! I really burnt Pooh's hair and especially around her edges by using excessive heat. It's been 11 months since she has had heat in her hair and it has done great. Now that's not to say I won't use heat ever again on her hair, but it does mean that it will not be often (1-2 times a year) and I will be sure to use heat protectant. I also will not try to get her hair BONE straight because she has 4b hair and there is really no need to expect it.

SECOND STEP: No more ponytails!! Since I decided to transition her hair, I stopped putting her hair in ponytails. I would usually do two in the front and 1 or 2 in the back. Now, I do twists, flat twists, etc. There are MANY styles you can do on natural hair that are FAR better for the edges. These styles would last a week at a time or even more and produced no stress on her hair. OFTEN times we don't realize that these "slicked" neat ponytails are simply too tight. They will always produce stress bumps and that's a sign we need NOT to ignore. If you especially see the white bulb (which may simply look like a white bump) that means you have pulled her hair out of the follicle. THIS is especially dangerous because prolonged practices like this could even stop that hair from growing there. Even my two year old will tell you when her hair is too tight...she will go "ouch" and will not let you touch it or cry when you do. Listen to your children. And again, with kinky, coily, and curly hair it is not necessary for your child's hair to LAY bone straight because THAT'S NOT HOW IT GROWS. Because our hair is easy to mold, if you just try you will find one to two wraps around the ponytail will suffice. It just needs a "hold" to know how to shape itself. Finally, if I have a need for "rubber bands" I use silicone ponytail holders that slip right off and do not cause tangles and knots.

THIRD STEP: I THREW OUT FINE TOOTH COMBS AND HARD BRUSHES!!!! And I know you're probably ready to close this post out right now but READ this with an open mind. Our baby's hair is not straight, it's full of kinks and coils. So the brush is not only yanking through those kinks and coils but also producing friction on the edges. How do I "lay" her hair down? Well if it's a style that requires that (which I rarely do) I will use either Shea Moisture Curl Soufflé or Eco Styler gel and then tie it down with a scarf for about 10 minutes. With KK's hair, it just curls up and I simply let it do so. But as I said, I rarely ever put their hair in a style that requires it to be slick. Another alternative I use if I need it is a toothbrush with much softer finer bristles. I also do not comb through our hair. AGAIN...kinks and coils. Combs will snag as well, and because I've found that even wide tooth combs snag our hair, I choose to finger comb. If this is just too far stretched for you, I would suggest a denman brush or a wide tooth comb. These are less harsh on our hair and especially our edges.

These are a few things that I incorporated along with our regimen. I am happy to say that Pooh's edges have grown in far better than before. I have even more pictures where her hair was LONGER and thicker until I begin to flat iron and put in too tight ponytails. I hope that you find this article helpful and not condemning! :)

But can we please just keep calm and save the edges?! LOL

#KinkyCoilyCool

**The last two pictures were of Pooh when she was 3, May 2010; the 2010 - 2012 comparison was in Dec 2010.


Healing Journey (Documentation) (Week 1)

If you read the previous blog, I talked about my plan to restore my scalp to a healthier state. Well this blog is to document the progress so this it will be updated continually. (If you haven't read the previous blog "Setback Drama" PLEASE DO!!)

January 20th -Night 1: I started with the routine at night and within less than 12 hours (Jan 21 - 10am) my scalp is not been itching or bothering me. I slept with a wrap on of course which helped to keep my hair from drying out and breaking as it rubbed against the pillows. Even though I have my hair in a protective style, I still believe in wearing bonnets and scarves at night. Even if I don't necessarily need it, it will keep me in good habit. I'm almost positive if I keep this routine up my scalp will heal in no time.

January 21 - Night 2: I sprayed my scalp ACV, applied coconut oil, and then Shea butter mix. My scalp is still feeling good. Not a lot of itching, although a little here and there. I applied this also for the morning of 1/22/13. It's not sore to touch so I'm quite positive this is working.

January 22 - Night 3 I decided to use something that I tried in December which worked perfectly and seems like its working again. A few months back, I made a mixture of Monistat 7 and oils. Many women have used it and supposedly related it to hair growth. I wasn't much worried about the hair growth as I was the cleansing my scalp of possible fungi. So anyway...as a last resort in December, I used it and my itching stopped completely. So I used it again after applying everything else and my scalp felt much better in less than 5 minutes. I have not applied anything else and probably won't until tonight - Night 4.

Nights 4-5 January 23-24
These last two nights were pretty much the same. It seems like the damaged skin is repairing itself. The texture is different. It doesn't itch and there are only a few spots that are tender. Also one spot will itch a little. It's right in the center. I'm still applying the same things. I'm wondering how long should I give it. I haven't placed anything on my scalp since the night application and overall it feels "normal."

Nights 6-7 January 25-26 (Friday & Saturday)
Friday night I continued the same routine.  Saturday morning my scalp was itching though.  However, Saturday night I placed tea tree oil in my coconut and applied that to my scalp.  Instantly, I could feel a tingle on my scalp.  I didn't layer with Shea butter mix, really out of pure laziness.  But I did take a look at my scalp as I prepared for night 8.  I will post pictures but I wish I would have taken pictures last week.  My scalp is starting to scab in areas that were once red and looks really clear.  I also added tea tree oil and rosemary oil to my ACV. I wouldn't say it's completely healed because some areas are still tender but I will say that it looks WAY better than last week.  I saw a little pink in a few areas but no red and raw looking skin.  Last week my scalp looked horrible and that's probably the reason that I didn't take any pictures. :-/  I did not place the Monistat cream on my scalp either night.

What I plan on doing this week is shampooing with Shea Moisture African Black Soap.  I'm going to DC and add garlic juice (I have a juicer and I'm going to juice the garlic and mix it in my DC).  "DC" = deep condition.  I also went and bought some aloe vera juice which I will include in my conditioner.  I will probably do a separate post on the benefits of each of these.  My sister in law has been using garlic in her DC's and it has stopped her shedding, thickened her thin spots, and even cleared her scalp!  Her scalp was red in a lot of areas and when I did her hair a month later, her scalp looked like it was 90% back to a healthy scalp.  So I'll definitely be trying and updating you on that.  So, week 1 has come to a close.  Moving into week two..I am going to begin a separate post.  And that post will include the pictures of my scalp before I use the African Black soap and aloe vera juice in my regimen.

So far...so good.  I'm impressed!!!

#werockinksncoils

Sunday, January 20, 2013

Setback Drama

Really, really sad day. :-/

Today is my 9th month naptural anniversary. It's been 9 months since I big chopped my hair to embrace my natural journey. Within these months I have only experienced two setbacks, this one and the first one at my 6 month. Both times I diverged from my regimen so let it be known that for OPTIMAL hair growth and health - A HEALTHY REGIMEN IS NECESSARY.

Anyway...I did a length check yesterday as I was getting to set my hair up for the protective style. It was the exact same length as my December length check which is NOT good. That doesn't mean that my hair didn't grow. Our hair grows an average of half an inch a month. I had been averaging an inch. So what happened?

Well the regimen. Let's see, for one I didn't make any more Shea butter for that month- which I used faithfully to seal in moisture. Also, it was colder in my region the past month and I was not doing any type of protection against it. I wore no scarves, beanies, or anything else. Although I kept up my weekly regimen, I did not keep up my daily regimen. And because my ends are colored my hair is more porous (it lets in moisture quickly and lets it out quicker), which means I have to work harder to seal in moisture daily! in addition to THAT, I was not oiling my scalp with coconut oil (penetrates the hair shaft and is anti-fungal).

Which in turn irritated my once healing scalp; it became highly sore and more irritated. Now my scalp is tender, patches of red soreness, and just overall uncomfortableness. My scalp was damaged over the years of processing with relaxers - mainly in the middle. And that's really where the irritation is. That is also the part of my hair that is thinner (although I can say that since I've been natural it has thickened up a lot because it was virtually no hair there!). For the most part, it was healing nicely as long as I kept my regimen up. It took me some time to realize what worked and what didn't and not keeping it moisturized definitely DID it!! TO ADD insult to injury, I let my newly natural god sisters borrow my peppermint, rosemary, and tea tree oil which are all ingredients I use in healing my scalp.

SOOOOOOOOOO here I am-
Short an inch AND an itchy scalp. ARRRRRRGH!

So here is the game plan.
1) Protective style - that's already done. I plan to keep the twists in for 2-3 months for low manipulation. Low manipulation allows your hair to be fee from tangling and breaking. ,
2) Spray hair with mix of water and organic Bragg's Apple Cider Vinegar.
3) Oil scalp with EXTRA VIRGIN olive oil and EXTRA VIRGIN coconut oil.
4) Apply Shea Butter mix to my scalp for sealing and healing.

Hopefully the marley hair won't irritate my scalp more- that would be a tragedy. So I leave you with one thing: please stick with a regimen that will promote healthy hair growth.

I'm out!

#KinkyCoilyCool

At LAST!!

Sooooo.

After completing both my girl's hair I finally got around to doing mine. Instead of yarn twist, I decided to do (unbeknownst to me) "kinky twist." All that I knew was that I was going to use marley hair. Didn't particularly know what I was going to do. After watching tons and tons of YouTube videos I decided to just do a set of twists with the hair.

As I started twisting them and looking at how they came out, I joyfully yelled (inside my head of course) "I'm doing my own kinky twist!!!l LOL!! That should give you an idea of how much I DIDN'T know how to do hair! Lol

And two bags of hair later (of which were not enough) I completely my twists and put them in a bun to hide the part not done.

I prepared my hair for the twist by:

1) "Shampooing" my hair with a mix of water, conditioner (Tressemme Naturals), and ACV (Bragg's organic).
2) Co-washing my hair with my Tressemme Naturals.
3) Deep Conditioning with coconut milk, Hello Hydrations Coconut Milk Soak, and Blue Agave. - I let it sit for 2 hours (only because I got busy doing work around the house; I only meant it for an hour).
4) T-shirt dried my hair after rinsing the mix out.
5) Applied a mix of extra virgin olive oil and coconut oil to my scalp and hair.
6) Applied my leave in conditioner (which was just a small amount of Tressemme naturals.
7) Finally, I applied my Shea Butter mix to seal in all that moisture.

That was pretty much it. Now the time lol...it took me a while, but I twisted for 5 hours straight before I stopped to cook, clean, fuss, etc. THEN I had company pop up...so that took some time away. Overall I am pleased!

I'll do another post specifically on maintaining moisture with both the kinky twist and yarn twist!

Til next time...thanks for reading!

#KinkyCoilyCool


Tuesday, January 15, 2013

Listening To Your Hair

First, let me say that I suppose my hair has been extremely mad at me and I'm disappointed that it took me all of 2-3 days to figure it out. I mean....it shouldn't have! Lol

Anyhow...I twisted my hair last Thursday. I needed some form of protective style but I've been too lazy to put in the yarn twists that the girls have. So I just put a set of twists up. Friday and Saturday, I didn't have a problem with my scalp itchiness. Then it hit me Sunday. First I was shocked because I haven't had this since the yarn twist. To ease the discomfort I simply spritzed some water/conditioner mix and kept kicking.

Yes. That was it. And my scalp became more and more irritated. I started spritzing with water, ACV, anti itch spray....NOTHING worked. Monday, same thing.
I was sleeping with my bonnet nightly but then my hair started sounding crunchy. I knew then my hair was BONE DRY. I wondered, HOW could it be dry!? So, I did another method: wet my hair, oiled it, and put a baggy over my hair for a few hours. And my hair STILL felt hard and crunchy with an irritated scalp as it dried.

Now I've been natural TOOOOOO LONG to not know what the culprits were. It finally hit me.
1) I was not sealing in the moisture with my usual LOC method.
2) I have high porosity (my cuticles don't close and moisture escapes quicker) which means I NEED TO seal in moisture and layer sealings.
3) I'm out of Shea Butter Mix :-/ I used this an excuse to not double seal and thought the oil was enough. WRONG!

So this morning...I did the following and by golly it worked like magic!
1) Spritzed hair with water and conditioner mix
2) Applied olive oil to my hair from root to tip! Making sure to get to the tip where it was most dry.
3) Applied Shea Moisture Smoothie from root to tip.
4) Applied Shea Moisture Curl Soufflé from root to tip.

And instantly....my hair was happy again!

My hair has retained moisture all day and my scalp hasn't been itching. I'm almost ashamed. After all...this was my routine and the whole purpose was to keep my hair from being dry!! But I got relaxed in the routine and my hair got mad!

Moral of the story.....

LEARN YOUR HAIR, LISTEN TO YOUR HAIR! Your hair needs moisture. Withoit moisture it will dry and if it gets bone dry you are creating an atmosphere for BREAKAGE! Things run much smoother if you just listen!

I will definitely be buying my Shea butter this week to make our Shea butter mix and getting off my laziness! #shameonme

Saturday, January 12, 2013

KK's Hair

KK is my baby girl, she is a toddler and her hair is very much in a virgin state. The most damage I did to her hair was with styling because they put damage on her edges and they thinned a little. They have grown back in good as well. Even her "cow licks" are growing in. (*silent praise* lol) She also had a short part in the back of her head (the part that usually breaks off when they are babies). But since taking out her last twist set, I noticed MAJOR growth! (More on that in a minute.)

KK has 4a hair but her ends are more 3c coils. The difficult thing about 3c hair with the styles is keeping the ends together. I've had to twist her hair in opposite direction of mine and Pooh's hair and that usually does the trick.

We have mastered the W&G's for her and I usually let her wear them for the holidays or weekends. I style her hair every Thursday. On the first and third Thursdays, I do protective styles and they last the entire week. On second and forth Thursdays, I do twist out or wash and go's. However, this week I am installing yarn twists in her hair so I'm doing it on a Saturday.

After her last twist set (I'll post a pic below) her hair thickened ALOT! Like I said, especially in the back and on the sides. I was a little doubtful about putting in yarn in her hair because she's just a toddler but since seeing the results, it will be a staple for our protective styles. Her hair really retained moisture; when I took the yarn down her hair was still soft from the curling soufflé. I will say that I would not however put other types of extensions in her hair.

If you've ever done a toddler's hair while they are awake, you probably can imagine how long this took me! Nevertheless, I'm done with hair styling for the next month!!!


Tuesday, January 8, 2013

Curls Gone Dry :-/...Somewhat

This is a follow up blog to the blog "Curls Gone Bad"

I figured the culprit was too much product. So today, in the shower I rinsed my hair. I applied no product- just water. When I got out of the shower, I applied a tshirt and let it sit for about 2 minutes.
I took the towel off and shook my head a few times.

The result:
My curls are still defined. But some of my curls are dry. I like the fact that they are still defined. I'm wondering if I should have put conditioner or something on it. Either way...I'm going to try the shingling at least two more times with a lesser amount of soufflé, Eco styler, or both.

Monday, January 7, 2013

Curls Gone Bad :-/

Well, technically my curls didn't "go" bad. They actually were VERY defined which I happened to like. What I DIDN'T like however was the spongy texture, the greasy feel, and the wet Jheri curl look I had going today.


I decided to do a last minute new style, the shingled wash and go. To accomplish this, all i did after my wash was apply the curling soufflé to small sections at a time, starting at the back and working my way up. To make sure my curl pattern was more defined, I applied more water to each section and then applied the Shea Moisture's Curl Soufflé. Now I have used the same product on Pooh's hair and KK's hair with great results. I don't think I'm going to throw it out just yet BUT I did also try the EcoStyler on a few curls as well. I also played around and mixed them together. Although it didn't leave my hair crunchy, it did leave it a little harder than what I like.

So, what do I do now? Since there is so much product left in my hair, I will do a rinse to loosen the curls and rid of excess product. *crosses fingers*. In this, I hope to have the definition of curls without the wet dog, glistening hair from Twilight look. Well their hair didn't glisten, but you get my point!

The joys of trial and error eh... :-/

On a good note--- I'm happy to see I can rock my kinky coils! I was über excited to see them so defined! My hair is still in a process of transition so this is a victory for me!

Pictures 1 & 2- morning
Pictures 3 & 4- afternoon


New Video Post!

Hey guys!!!

I've posted two new videos.  One is a video that shows the recent protein treatment I used.

The other is a video of me washing Pooh's hair, detangling, applying the protein treatment, and then how clean her hair is after the wash!  I really wanted to make the point that you can survive with NO POO!! (No shampoo.)  Her hair was nice, clean, and strong after the protein treatment and ready for the yarn twist!

Hope you enjoy.  www.youtube.com/weROCkinksNcoils

Below are the finished results of the yarn twist after the treatment!

Pooh with yarn twists after protein treatment.

Sunday, January 6, 2013

January Length check!!! -Pooh

The yarn twists are up!

I think it took me about 5-6 hours to complete. I was installing them, I made sure to do a length check. I do these at least once a month to monitor growth. This way, I can see if she is retaining and length. If not, then I will know to switch my regimen or products up.

Right now, her hair is arm pit length. The goal for this year is to get it waist length- WITH the damaged hair cut off. So I will try protective styles for the next few months in my attempt to grow out the damaged hair. She LOVES the length of these yarn twists anyway, so I hope she doesn't get bored with them.

I will leave these up for exactly 4 weeks, take them down, and do another length check! She is DEFINITELY a HAPPY NATURAL!


Friday, January 4, 2013

The 411 on HOT OIL TREATMENTS

As I've mentioned, we do weekly hot oil treatments before everything else.  I decided to give details on each step that we take for our routine.  This blog will focus on the hot oil treatments. 
 
First I want to explain why I feel like this is a necessary step for us.  African American hair is in need of lots and lot of moisture.  However, during the washing process, our natural moisture can get stripped from our hair.  So hot oil treatments are a way of preparing our hair for the next few steps.
 
"Oiling your hair before washing it, gives your hair a softening, deep oil treatment. It also provides extra protection so that your hair doesn't get completely stripped during the shampoo process. No wonder hot oil treatments became so popular for a while! Warm your oil in the microwave or cover your head with a warm towel for faster results." (1)
 
Now, the key to hot oil treatments is the oil.  The most effective oils are olive, avocado, and coconut. Be sure that you use extra virgin oils, nothing modified; you want the purest form of the oil that you can find.  The molecules in these oils are small enough to penetrate the hair shaft and therefore softens and strengthens our hair.  There are multiple benefits of olive, avocado, and coconut oils that I will reference in another blog. 
 
My personal favorites are olive and coconut.  I usually mix these two together and then warm in an applicator bottle.  (Coconut oil is solid at room temperature but it will melt when applied.) 
 
1. Once the oil is warmed and applied to our hair, I place a plastic bag over our hair. 
2. For extra penetration, I will place a beanie or scarf over the plastic bag.
3. I let penetrate for 15-30 minutes.
4. Rinse and begin co-wash!
 
Very simple but very important step to us.  My oldest daughter hasn't had an ounce of dandruff since I started implementing hot oil treatments back in February.  Feel free to use either oil by themselves or mix them together!  Have fun with the runny oil!!! HA HA!!


Wednesday, January 2, 2013

Bedtime Routine

Wellll!!!!

It's bedtime. Baths are taken, teeth are brushed, and then Pooh goes: "I want to show them how I do my hair for bed."

As shocked as I was, I didn't object. So we made a video...background noise and all. Now, while I'm not sure whether I'm going to POST the video, I did think it was a good idea to share with the blog.

Two simple steps.

1. Spritz hair lightly with spray bottle. (Remember the spray bottle with water, conditioner, and oil.). Be sure to distribute to ends.

2. Place a satin bonnet over head.

That's it. Unless we're wearing protective styles in which case I add in a stocking and cover the hair to combat any frizz. And THEN place the bonnet over hair.

Now this may seem like an unnecessary step but its an important part of our kinks and coils for two main reasons:
a: Prevent the hair from drying out due to over exposure to the cotton that's in the pillow case
b: Prevent breakage from occurring due to dryness which comes from over exposure to the cotton pillow case

It may seem unimportant but again, this small simple step maintains moisture and happy hair. Again. Natural hair NEEDS moisture...so we want to minimize dryness as MUCH as possible. You can also just use a satin pillow case or satin scarf. Either way, our hair needs to be protected against the cotton!!! :)

**I decided that I would post the video we made.  Check it out on the channel...nothing special just a regular home video!**
www.youtube.com/weROCkinksNcoils


January Protective Style of the Month: Yarn Twists

A protective style is just as implied, it protects your child's hair from high manipulation, which leads to breakage.  The best thing about protective styling is that as a mommy, it eases the burden of having to style their hair each day.  Because you are not submitting the hair to constant manipulation, it allows it to just grow.  My length goal for Pooh (the oldest) is waist length by the end of the year (as well as growing out all of the damaged ends from excessive heat).  Therefore I will be utilizing protective styles for at least the next few months consistently.  For myself, I also have a goal to reach bra strap length by the end of the year.  I will be utilizing protective styles at least through April 20th which will mark my 1 year since my BC (big chop).  I will talk more on length goals and other things I am doing to get there.  But for right now, low manipulation, protective styles is the main thing.
 
I've chosen as a protective style: yarn twist.  I have not "up'd my game" on braiding yet, so for now I will stick with yarn.  Yes, regular yarn from Walmart.  From November to December, both my oldest daughter and I wore yarn twist.  We both experienced a great amount of new growth.  I co-washed our hair every other week.  I went several days with moisturizing because the yarn tends to hold in the moisture and does a great job!  When I took down her hair, it was MEGA soft!!!
 
This week, I will be re-installing the yarn twist.  Since the curling souffle seems to work incredibly well for moisture and hold, that is the only styling product I will use.  I will go step by step through the normal regimen completing a protein treatment this week and then proceeding to install the yarn twist for this month's style.  (Our regimen can be found on a previous post.)
 
I will co-wash every other week.  I will also use the handy dandy spray bottle of water and ACV if need be.  One way that I fight the frizz is to use a stocking over her hair and then add the bonnet.  I will add coconut oil to the scalp as needed. 

 
My first set of yarn twist, installed by me :)
 
KK's first protective style with yarn.  (Inspired by www.chocolatehairvanillacare.com -GREAT WEBSITE!!!!)
 
Pooh's first set of yarn twist...the very last week before I took them down.
 
What are some styles you use to protect your child's hair for a longer period of time?

New Video: High Bun Style

My daughter told me on yesterday that she wanted to wear her hair in a bun on today. WELLLLLLL

As I was fixing my wash and go fro for today, she starts to get the spray bottle and do her hair! Lol

So we shot our first video! Yaaaahhhhh

Www.YouTube.com/weROCkinksNCoils

ENJOY!


Tuesday, January 1, 2013

New Video!!! My Product Stash!

After talking about ingredients in products and etc., I figured it would be helpful to share my own personal product stash.

Hope you find it helpful!

www.youtube.com/weROCkinksNCoils

What's In YOUR Products?

Sooooo what's in a product?! Why have I changed up ALL of our products!? Below is a list of the top ingredients to avoid AND why! So go get your hair supplies...and let's see how many of these chemicals you can find! Ready?! Set?! Go!
 
1. ISOPROPYL ALCOHOL:
This is a solvent and denaturant (poisonous substance that changes another substances natural qualities). Isopropyl alcohol is found in hair color rinses, body rubs, hand lotions, after-shave lotions, fragrances and many other cosmetics. This petroleum-derived substance is also used in antifreeze and as a solvent in shellac. Napptural hair reacts very badly to alcohol and this ingredient should be avoided at ALL costs. It will dry your hair out and break it off. According to A Consumer's Dictionary of Cosmetic Ingredients, inhalation or ingestion of the vapor may cause headaches, flushing, dizziness, mental depression, nausea, vomiting, narcosis and even coma.
2. MINERAL OIL & PETROLATUM:
The best baby oil is made from almonds. But the oil which being sold as baby oil is 100% mineral oil. Mineral oil is a derivative of crude oil (petroleum) that is used industrially as a cutting fluid and lubricating oil. This commonly used petroleum ingredient coats the skin and hair just like plastic wrap. The skin's natural barrier is disrupted as this plastic coating inhibits its ability to breathe and absorb the Natural Moisture Factor (moisture and nutrition). The skin's ability to release toxins and wastes is impossible through this "plastic wrap," which can promote acne and other disorders. It further hinders normal skin respiration/transpiration by keeping oxygen out. This process slows down skin function and normal cell development causing the skin to prematurely age. Holding in large a mounts of moisture in the skin can "flood" the biology and may result in immature, unhealthy, sensitive skin that dries out easily. Petrolatum - A petroleum-based grease that is used industrially as a grease component. Petrolatum exhibits many of the same potentially harmful properties as mineral oil.
Honestly, this stuff belongs in your engine, not on your hair. Regardless of "Well, my Grandma used Vaseline on her hair and it grew ", the bottom line is this stuff is bad. It was bad for Grandma and it is bad for you. Period.
3. PEG:
This is an abbreviation for polyethylene glycol that is used in making cleansers to dissolve oil and grease as well as thicken products. Because of their effectiveness, PEG's are often used in caustic spray on oven cleaners and yet are found in many personal care products. PEG's contribute to stripping the Natural Moisture Factor, leaving the immune system vulnerable. They are also potentially carcinogenic.
4. PROPYLENE GLYCOL (PG):
As a "surfactant" or wetting agent and solvent, this ingredient is actually the active component in antifreeze. There is no difference between the PG used in industry and the PG used in personal care products. It is used in industry to break down protein and cellular structure (what the skin is made of) yet is found in most forms of make-up, hair products, lotions, after-shave, deodorants, mouthwashes and toothpaste. It is also used in food processing. Because of its ability to quickly penetrate the skin, the EPA requires workers to wear protective gloves, clothing and goggles when working with this toxic substance. The Material Safety Data Sheets warn against skin contact, as PG has systemic consequences such as brain, liver and kidney abnormalities. Consumers are not protected nor is there a warning label on products such as stick deodorants, where the concentration is greater than that in most industrial applications.
5. SODIUM LAURYL SUFATE (SLS) & SODIUM LAURETH SULFATE (SLES):
SLS is used in testing labs as the standard ingredient to irritate skin. Used as detergents and surfactants, these closely related compounds are found in car wash soaps, garage floor cleaners and engine degreasers. Yet both SLS and SLES are used more widely as one of the major ingredients in cosmetics, toothpaste, hair conditioner and about 90% of all shampoos and products that foam. They are used in personal-care products because they are cheap. A small amount generates a large amount of foam, and when salt is added it thicken to give the illusion of being thick and concentrated. (SOME OF THE NITROSATING AGENTS ARE: SLS, SLES, DEA, TEA, MEA). Shampooing the hair with a product contaminated with these substances can lead to its absorption into the body at levels much higher than eating nitrite-contaminated foods.
Mark Fearer in an article, Dangerous Beauty, says, "...in tests, animals that were exposed to SLS experienced eye damage, along with depression, labored breathing, diarrhea, severe skin irritation and corrosion and death." According to the American College of Toxicology states both SLS and SLES can cause malformation in children's eyes. Other research has indicated SLS may be damaging to the immune system, especially within the skin. Skin layers may separate and inflame due to its protein denaturing properties. It is possibly the most dangerous of ad ingredients in personal care products. Research has shown that SLS when combined with other chemicals can be transformed into nitrosamines, a potent class of carcinogens, which causes the body to absorb nitrates at higher levels than eating nitrate contaminated food." According to the American College of Toxicity report, "SLS stays in the body for up to five days..." Other studies have indicated that SLS easily penetrates through the skin and enters and maintains residual levels in the heart, the liver, the lungs and the brain. This poses serious questions regarding its potential health threat through its use in shampoos, cleansers and toothpaste,"
Studies show its danger potential to be great when used in personal-care products. Toxicity - A serious problem with these chemicals is that they may be contaminated with NDELA (N-nitrosodiethanolamine), one of the nitrosamines and a potent carcinogen, according to a 1978 FDA report.
Sodium Laureth Sulfate (SLES)
- SLES is the alcohol form (ethoxylated) of SLS. It is slightly less irritating than SLS, but may be more drying. Both SLS and SLES can enter the blood stream. They may cause potentially carcinogenic formations of nitrates and dioxins to form in shampoos and cleansers by reacting with other product ingredients. Large amounts of nitrates may enter the blood system from just one shampooing. Contains ether.
6. CHLORINE:
According to Doris J. Rapp, M.D., author of Is This your Child's World? exposure to chlorine in tap water, Showers, pool, laundry products, cleaning agents, food processing, sewage systems and many others, can effect health by contributing to asthma, hay fever, anemia, bronchitis, circulatory collapse, confusion, delirium diabetes, dizziness, irritation of the eye, mouth, nose throat, lung, skin and stomach, heart disease, high blood pressure and nausea. It is also a possible cause of cancer. Even though you will not see Chlorine on personal care product labels, it is important for you to be aware of the need to protect your skin when bathing and washing your hair.
7. DEA (diethanolamine) MEA (momoethnanolamine) TEA (triethanolamine):
DEA and MEA are usual listed on the ingredients label in conjunction with the compound being neutralized. Thus look for names like Cocamide DEA or MES, Lauramide DEA, etc. These are hormone disrupting chemicals and are known to form cancer causing nitrates and nitrosamines. . These are commonly found in most personal care products that foam, including bubble baths, body washes, shampoos, soaps and facial cleansers. On the show, CBS This Morning, Roberta Baskin revealed that a recent government report shows DEA and MEA are readily absorbed in the skin. Dr. Samuel Epstein, Professor of Environmental Health at the University of Illinois said "repeated skin applications of DEA-based detergents resulted in a major increase in the incidence of two cancers - liver and kidney cancers." John Bailey, who oversees the cosmetic division for the FDA said the new study is especial important since "the risk equation changes significantly for children."
8. FD & C Color PIGMENTS:
Many color pigments cause skin sensitivity and irritation. Absorption of certain colors can cause depletion of oxygen in the body and even death according to A Consumer's dictionary of Cosmetic Ingredients. Debra Lynn Dadd says in Home Safe Home: "Colors that can be used in foods, drug, and cosmetics are made from coal tar. There is a great deal of controversy about their use, because animal studies have shown almost all of them to be carcinogenic."
9. FRAGRANCE:
Fragrance is present in most deodorants shampoos, sunscreens, skin care, body care and baby products. Many of the compounds in fragrance are carcinogenic or otherwise toxic. "Fragrance on a label can indicate the presence of up to 4,000 separate ingredients. Most or all of them are synthetic. Symptoms reported to the FDA have included headaches, dizziness, rashes, skin discoloration, violent coughing and vomiting, and allergic skin irritation. Clinical observation by medical doctors have shown that exposure to fragrances can affect the central nervous system, causing depression, hyperactivity, irritability, inability to cope, and other behavioral changes," (Home Safe Home).
For better health try purchasing unscented products and for fragrance, adding a natural essential oil.
10. IMIDAZOLIDINYL UREA and DMDM HYDANTOIN: These are just two of the many preservatives that release formaldehyde (formaldehyde-donors). According to the Mayo clinic, formaldehyde can irritate the respiratory system, cause skin reactions and trigger heart palpitations. Exposure to formaldehyde may cause joint pain, allergies, depression, headaches, chest pains, ear infections, Chronic fatigue, dizziness and loss of sleep. It can also aggravate coughs and colds and trigger asthma. Serious side effects include weakening of the immune system and cancer. Nearly all brands of skin, body and hair care, antiperspirants and nail polish found in stores contain formaldehyde-releasing ingredients.
If the above information is not enough to make you read labels on things before using them on yourself of your babies, nothing will.
 
(Source: #teamNatural Facebook group by Constance Cash)
 
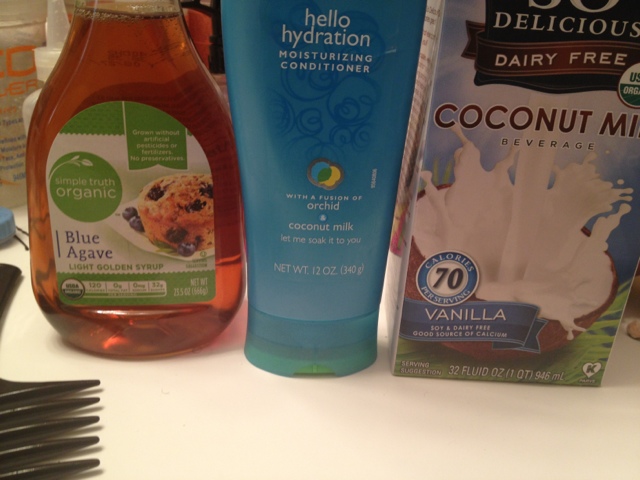
Now if you're somewhat like me, you're probably thinking "I have to look for all this EVERYTIME"...WELL I will tell you how I manage to weed out the bad products. 
 
I use the first 5 ingredients.  The first ingredient in any product for our hair should be **drum roll please**....................WATER!!!/AQUA!!!  Thus the label "water based product."
 
Products are listed according to the amount of the product.  So for example, if mineral oil is the first ingredient, I rule it out.   That means it has more mineral oil in it that any other ingredient.  See how these labels will trip you?  They tell you their product has natural ingredients BUT you have to understand that if those natural ingredients are listed further and further down, you are getting more CHEMICALS than ORGANIC.  So I judge the first five.  I look for those ingredients.  This knowledge transformed our hair tremendously!!!
 
Until next time...
#kinkycoilycool #naturalhairmommies

What's a hair type?!

You've probably never seen it before...but did you realize that every person's natural hair is different?

How do you know? And what's the importance?

Well hair type is important because the hair TYPE should determine the hair REGIMEN.

African Americans mainly have hair type ranging from 3c - 4c.

3c curls are loose corkscrew-like curls that usually produce a wavier pattern.

4a curls are tighter, springy looking curls.

4b curls have a zig zag shape pattern.

4c has no definite curl pattern, variations of curls patterns.

Because of the different textures, yes, curls would require different treatments. Not one is "better" than the other. Lets throw away that "Good hair, bad hair" mentality. But we are the only race that has sooooooo much variety and I, for one, take pride in this.

My baby girl and I have type 4a hair, and my oldest has type 4b. The main difference is that I have to make a little more effort into making sure her 4b hair is moisturized thoroughly and stays moisturized. Otherwise it will be prone to breakage, tangling, heat damage, and more. 4a is fragile, but 4b hair is more fragile.

Here is a link to more information on hair types.

http://www.naturallycurly.com/pages/hairtypes/type4


Your Child's Hair IS Manageable! JUST LEARN IT!

So many times before I learned how to care for our hair, I always said: "I just don't know what to do with it." Because of this, doing our baby's hair becomes a headache.

I DREADED doing her hair!!!!

And for 4 years I damaged my daughter's hair by ALWAYS flat ironing it after her washes. There was no regimen of specific time frame, nothing consistent. I would use Sulfur 8 shampoo for the tons and tons of dandruff she had instead of taking the time to learn WHY she had it. I used thick, heavy hair lotions that were filled with mineral oil, petroleum, and other harmful chemicals.

On top of that I always had two ponytails , constantly putting stress on her edges. I used rubber bands, constantly pulling on her hair and making it weak at those points.

See, I took care of it the way I took care of relaxed hair and through my ignorance, my daughter's edges were taken out, hair was burnt, and scalp was completely dried out! The dandruff was ridiculous!!!!!

AND THEN!!!!!!!!

I made the decision to return natural. And I learned how to actually take care of my child's hair. I had to realize I DID NOT KNOW how to take care of her curls and her textures. As mommies we must be humble enough to realize that!!!

NOW!!! She is dandruff free! Has been for 8 months now! Her edges are growing in INCREDIBLY! Her damaged ends are almost off. Her curls are popping in!!! And I can take my fingers and rake them straight through her hair.

Here a few things I changed:
1. I put her on a regimen. See my previous post for details.
2. I NEVER comb her hair. LOL funny huh...NO, I do not use a comb (unless its for parting) through her hair.
3. I do not BRUSH her hair...nope. An d I don't have to.
4. I finger detangle her hair during washing.
5. I wash her hair in sections of 4.
6. I do protective styles (flat twist, twists, buns, etc.) and I tell you her curls are soooooooooooo versatile! I have tried WAY MORE things with her hair than I EVER did in my ignorance of natural hair care.
7. Rubber bands? WHAT rubber bands?! Don't use those. If a style needs to be secured I use silicon ponytail holders and ONLY wrap around TWICE! Realize that natural hair is puffy and it will swell as it dries! LET IT!!!!
8. The first thing I look for now in a product is ingredients. See, most commercial products have chemicals in them that dry out natural hair- this irritations and dandruff. Not only that, most shampoos strip natural hair of its moisture (this leaves that "squeaky" clean feel that we think is right) and conditioners have too many products that BLOCK the hair shaft from receiving moisture. I will blog about these things later.
9. ALWAYS SLEEP WITH A SATIN BONNET!!!!!! You need a satin scarf, satin bonnet, or satin pillow to sleep with. Otherwise the cotton dries the hair out and can cause breakage.
10. We do not use TOWELS to dry our hair, but rather old white t-shirts. The towels are more abrasive!

The most amazing transition is that she is dandruff free and has edges! You will see from the pictures.

My advice--
1. Realize natural curls are delicate and can be managed successfully WITHOUT common practices that we are use to from being relaxed.
2. Let your girl's kinks and coils do what they wanna do!!!!
3. Learn about natural hair. There are different types and therefore every product and style won't work for your child's hair! LEARN HER HAIR!!!

#weROCkinksnCOILS
#teamNaturalMommies


Our Regimen ending 2012

One thing I've learned in the last 8 months is to keep things SIMPLE!!!

Right now, this is the routine I am following. Although I am trying to keep up protective styles, in between those, this is what we all follow. I am also playing around with wash and go's (which trust I will explain later) and that's another ball game. But here are the basics!

(I usually do my oldest daughter's hair on Sundays, baby girl's hair on Thursdays, and mine on Fridays.)
My Regimen - All done on one day

1. Hot oil treatment (any oil will do) at least once a week:
Olive oil and castor oil mixed together and warmed in the microwave.
Put on scalp; let it sit for 15 min (I usually cover with a plastic cap for extra penetration)

*Purification mask (Shea Moisture) if necessary to get rid of product buildup.

2. CO-wash with Tressemme Naturals
Rub scalp first, then condition down to the ends. Finger detangle hair. (You can use a wide tooth comb also, I just don't.)
If necessary I will use a spray bottle mixed with Apple Cider Vinegar to cleanse scalp during this step too.)

3. Deep Condition (once a week)
--Moisture: Tressemme Naturals mixed with oils and leave on for 30 min; rinse out
--Protein: mayo, egg, & honey mix; leave in for 30 min; rinse
**protein treatments only about twice a month**

4. Rinse conditioner then LOC METHOD
Liquid- Tressemme Naturals conditioner
Oil- doesn't matter which
Cream/Butter- Shea Butter Mix

*I do not comb through our hair because it will ruin the curl definition and make it fuzzy. I usually let it air dry if doing a wash and go OR go ahead and style.
*If I'm setting a style I apply the EcoStyler or Shea Moisture Curl Soufflé AFTER the LOC method.


~~Daily moisturize as necessary with spray bottle mix:
Water 3/4
Leave in conditioner 1/4
Olive oil
Then coat with Shea butter mix (I make this myself.)

Moisturize scalp with spray bottle mix and then coconut oil.
**It is good to follow this with a scalp massage; it will increase circulation to your scalp and is good for promoting hair growth.**


WELCOME TO MY WORLD!!!!!

In February 2012, I made of the most drastic changes ever...

I returned to wearing my hair in it's natural state.  YAAAAAAAH!!!!

If you know me then you know I am uber excited and have a GREAT passion for this now.  Soooo....
I hope YOU are excited...because I am excited and have been for quite a while now!  I have not only had the pleasure of learning my own hair, but learning my daughter's hair as well.  Now while this blog is meant to track our progress throughout this year, one of the things that really, REALLY hurt my heart is to see mommies not understand what to do with their daughter's hair.  I myself was one!!! You will see for yourself the transition of damaged to healthy hair in my oldest daughter.  So this is definitely not a bashing blog for relaxed moms...I just had to realize that I simply DID NOT KNOW!!!

So this blog is mainly about helping mommies!  I find myself repeating so much stuff to women and of course it's not a problem, but I figured I would start a blog and YouTube channel that would help us out.  I have learned from ALOT from YouTube videos and post of others. 

So the purpose of this blog?

1. Track our progress.
2. Help other mommies.

Simple!!!

#KinkyCoilyCool